Tuesday, 20 September 2011

You know what they say...

Does this look too crazy?
Men with over-large plumes must be compensating for a deficiency elsewhere!  Anyhow, I really like the "bottle brush" style of the mid-Napoleonic Russian Grenadiers.  Preposterous but good fun and creating an ImagiNation should be FUN!.

The obvious choice for this would be the forthcoming Warlord Games' "Russian Infantry 1809" plastic set (32 figures £18.00)  However, the cheapskate in me is drawn toward Victrix's various Austrian sets each containing enough figures for two 24  man regiments (plus spares) and all for a measly £22.00.

Now of course these sets do not contain any "bottle brush" plumes but I could certainly make a simple push-mould to fabricate these for the Grenadier compliment.  With this in mind I created a couple of crude mock-ups showing the figures with such plumes but I am stumped as to which looks better.

Shakos with bottle brush - more plausible?
The shako wearers are certainly less "outre" but the Landwehr guys are great fun.   Some opinions would be welcome.  Does the "corsehut" with bottle brush look too ridiculous?

Please remember the painting in these pictures is immaterial as these troops would be in the traditional B-S yellow.

As a footnote, the final plume may be a tad larger as these look a little insipid.


Saturday, 10 September 2011

Warlord Games' Russian Infantry

After a long hiatus I am back!  Apologies for the absence but other projects interfered with the ImagiNation work.  Hopefully I will now be able to devote some of my time to the occasional article here.

I was at Colours today and got my mitts on a couple of the trial sprues for the upcoming Russian Napoleonic sets.

PAinted examples from Warlord's website.
First impressions were/are very favourable.  The sculpting is clean and the proportions are an improvement over the earlier Prussian Landwehr – although the hands are still large!

Each figure comes in three parts (head, backpack and body) and will therefore prove easy to assemble with some liquid poly.

Both the early and late sprues sport covered, uncovered and grenadier shako heads.  These are rendered nicely.  The only odd point is that the Grenadier heads are split down the centre by the mould.  I imagine this was in order to be able to mould the plume integrally.  That said, it is never a favourite option for me as one slip during clean-up and your figure is deformed!

Anyway – they look good and apparently should be out end Sept/ Early Oct.

I will snap up a box or two of the "early" option for Beimbach-Schönau's very late C18 army.  All we need now are those damn Austrians from Victrix!

Thursday, 7 April 2011

Resting

I would like to apologise to my readers for the lack of posts over the last week or so.  The reasons are three-fold:

Relaxing at the tavern.


  • I have been preoccupied with vacation plans - Athens beckons in August and logistics are complicated.
  • My new World War Two blog has taken up quite a bit of my spare time.  A case of robbing B-S to feed FK!
  • Thanks to three small children, the house is a mess and I have little room to do what I want.
Anyway, I have the oasis structure ready for painting and my new uniform plates are near completion.  The Wargames Factory Marlburians are ready for assembly and the process will be documented.

In addition I chanced upon a long-forgotten (and very cheap) C18 miniature that may be of interest.

All of this to come in the very near future.

Thanks for your patience.

Tuesday, 29 March 2011

Review: Blaze Away Miniatures' "Marlborough's Wars" Infantry

Like many collectors, I want to obtain figures that look a little "different"  Additionally, as recruiting funds are limited, I like to find items that are good value.  When I chanced upon Blaze Away Miniatures & Models early C18 range, my interest was piqued.

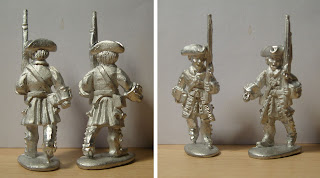
MAL2,3 & 5 with venerable Foundry "Marlburian"
Marketed under the generic "Malborough's Wars" legend, on offer are 13 packs (7 Infantry, 5 Cavalry and 1 High Command) priced fairly competitively at AUD$10.00 / £6.40 - your money buys you 6 foot or 3 cavalry.  Additionally, they offer a sample service for a very low sum - details at the site.  All very well but are the little chaps any good?  My opinion is a solid "Yes" - they are well worth a look.

I obtained three Infantry samples.  All wear a tricorn and have hair hanging loose rather than the later "cue".  The three poses I sampled are MAL2 Marching, MAL3 March Attack & MAL5 Advancing.  These are shown, along with an old Foundry Marlburian, in the photo to the right  .

As can be seen the figures stand 28mm foot to eye, though the thick bases make them appear a little taller.  The level of detail is good and the anatomy is decent. Figures display heavy lacing on the coat front and cuffs.  The coat itself is of "full" cut.  They sport a small satchel on the right hip and carry muskets without bayonet.  Supplied as a loose part is the sabre, ready for the buyer to attach to the left side of the model.   I am aware some people will dislike this feature but I do not.  Clearly it has been decided that it is prudent to cast the figures in two parts and thus eliminate a common miscasting area.

Earlier C18 in gaiters? Great!
I am not particularly keen on "advancing" poses as I prefer my units to march for all eternity.  However MAL5 is a perfectly acceptable miniature.  I think he would be well suited to a skirmishing unit - perhaps in the Colonies?  The marching poses are particularly attractive and can (in my opinion) be used mixed within the same unit.  To my delight they are modeled in gaiters rather than the more usual stockings and breeches.  The mixture of earlier C18 coat and gaiters makes these fellows pretty unusual in 28mm and ideal for my 1740 project.


The sabres ready for attachment.
Criticism is limited, MAL2's right arm may be a little short and the heads a little large but the latter affliction is near universal in 28mm.  That said, overall the figures look good.  They have bland facial features and to me this is a plus (character figures look great once but in every Regiment? No thanks!)  Well painted they would present a splendid appearance.

It should be noted that at present BAM do not offer any Grenadiers or Artillerists and I have no idea if they plan to rectify this.  I imagine Dixons' gunners would work well in concert with these chaps.  The cavalry options are limited but Dragoons & Cuirassiers are certainly there.  As mentioned earlier, there is a pack of bewigged Generals that look interesting.

From the quality of the samples and shipping time (under 1 week from Australia - UK) I recommend anyone interested in these obtains some samples pronto.


Scores out of 10 - thoroughly personal ratings explained:

Sculpting - Quality of detail and accuracy
Casting - Mismoulds and flashing
Variety - How comprehensive is the range
Service - Was the seller easy to reach, polite and helpful
Delivery - How long did they take to get to me
Value - Are they a good deal overall

Delivery time based upon my experience - Australia to UK delivery.

Sculpting:                  7/10 
Casting:                    9/10 A few pinholes but excellent overall.
Variety of Subject:    5/10  No Artillery or Grenadiers.
Customer Service:    */10  Dealings automated, therefore no rating.
Delivery Time:          10/10 Less than a week from the other side of the World!
Value:                      8/10


Friday, 25 March 2011

Building "Fort Kalypso" - Walls finished & Base started

Brush away  the excess "dusting".
As I promised two days ago, today I will show the finished walls. Drum-roll please!

The freshly plastered walls were dusted with dry filler in order to smooth the finish and "fix" it in place.  We left the structure looking as if it was pebble-dashed.  It is a finish that works nicely in some circumstances but not for old plaster render - for that it is woefully over-scale.

After checking carefully that the building is thoroughly dry take a stiff brush and start brushing the "dusting" from the walls.  The amount you remove is a matter of personal choice - I wanted only a few areas with a rough finish so brushed the majority away.  Any especially lumpy or rough areas can be tackled with glasspaper but remember the whole point of this method is to achieve a flawed facade.   If you want smooth flat surfaces grab the foamcore!  When you have the finish you think looks right - STOP!  There is always a temptation to fiddle but this should be resisted.

Be warned this is extremely dusty work covering everything nearby.  I would advise a dust-mask and vacuum cleaner.  Alternatively you could get brushing outside - again wearing a mask.

Groundwork applied and smoothed.
Once happy with the building, mix a generous amount of cheap filler/spackle to a pretty thick consistency.  Place your building on a flat and level surface (I use IKEA particle board off-cuts)  covered with a plastic sheet or a garbage sack.  The filler should be worked up to your building's edge and smoothed with a wet brush.  What you are creating here are the ground contours, remember any foliage will be seated on top of this surface so make allowances.

Do not waste your cash on flashy "talus",
While the groundwork is still wet sprinkle all areas (apart from those smoothed by traffic) with a mixture of crushed plaster "sprinkles" (this can be made from excess filler left to dry, placed in a plastic bag and pounded with a hammer - much cheaper than proprietary "talus")  At this juncture the amount of surface texture should be overdone - think of your childhood and making glitter pictures.  If you follow the instructions, your base will end up looking like a debris-field but in the final stage the majority of this will be lost so do not fret!

As before, place this somewhere safe to dry allowing a few days (or more) for the groundwork to "set".

Next part is the FINAL construction phase then it's on to painting.

Wednesday, 23 March 2011

Building "Fort Kalypso" - Stage 3 - Walls

Tools and supplies - simple stuff.
Yes it's been a while since the last update on this project but I have been making progress - albeit interrupted by real-life and at a pace that is somewhat slower than envisaged!  Anyway, a few weeks back I completed the application of the wall coatings - I call this "rendering"

The tools needed are nothing special but in the interest of completeness, please see the photo to the left.  At this stage I use pre-made filler/spackle as it adheres to the walls in a superior manner to the stuff you have to mix by hand.  That kind of filler will be used in the final part of the process.


Messy work is fun!
The first step is pretty scary, cover the model in the filler, yes slap it on liberally.  If the building is big, handle one surface at a time but if you put aside a couple of hours even a fair sized structure can be coated in one sitting.  Work the filler into and onto the surfaces of the Oasis making sure it has adhered.  Be very careful around the door and window apertures as you certainly don't want to ruin your carefully made woodwork!  When it comes to any exposed stonework, use watered down filler and brush it into the details without obscuring them.


The three stages shown in sequence.
Once the building is covered, get to work smoothing the plaster with a spatula/palette knife/trowel (or a mixture of all three)  This part requires a good deal of practice but is very similar to icing a cake!  Get the surface smooth - but not too smooth (remember this is supposed to be a dilapidated Third-World structure) in places let the tool "drag" into the surface and "catch" the plaster.  Work the render up to the window and door apertures with care, the last thing you want here is a ridge of filler hanging into the cut-out.  The same applies to any rocks on the base - work carefully.

Next it is time to further refine the finish with a wet brush and plant-mister using enough water to make the plaster workable but not so much to cause it to become sludge.  It is a case of "suck it and see" but you will soon get the hang of it.

The finish for which you are aiming.
So, after a half hour or so you will have a building covered in carefully (or not so) smoothed plaster.  Therefore the next stage may seem crazy.  Take your little sieve and dust the entire structure in filler powder.  Dust it liberally but do not allow it to build up in damp areas as you will create problems down the line.  You will end up with a finish that resembles over-scale pebble dash.  Incidentally, avoid dusting the exposed stonework - if some dust is deposited here, smooth it away with a wet brush.

Now set your structure aside to dry, this will take at least a couple of days in a pleasant climate - in England allow double.   Do not be tempted to place the work in an airing cupboard or boiler room as this may lead to the plaster cracking.

Next installment shows the process concluded and the groundwork applied.  I will post this in a day or so.