Monday, 28 February 2011

Sloppy service - a rant!

"A three month wait for miscasts madam?"
Your author has been buying wargames items for over a quarter century and I am sad to say that I feel the general level of service is deteriorating.  I am tired of poor service from manufacturers and wonder if others are also.  

With your average 28mm figure now priced well above the psychological £1.00 barrier, we are paying more than ever before to get our hands upon little lead men.  When paying such a premium I for one expect a good standard of service and also a product that is quality checked before dispatch.

Actually, I believe whatever price you pay the item should be in fit condition and supplied as advertised.

Yes of course delays will occur and miscasts will slip through - everyone makes a mistake now and then.  However I cannot help but feel that a great many vendors are just sloppy or simply hope their mistakes won't be noticed by the buyer.  Alternatively, perhaps they bank upon customers' reticence to complain - this is something from which I do not suffer!

It is not my intention to "name and shame" anyone in particular but in the last six months I have been fed a great many cock-a-mamey excuses, including:

  • "I am a one-man-band.  That is why I billed your credit card three weeks ago and have not even got around to filling your order" - very popular.
  • "Sid/Jim/Bob (delete as applicable) went on holiday the week after we got your order and we have to wait for him to come back."
  • "Miscasts?  Well yeah, there are a few but most customers never complain."
  • "Our moulds are old and the metal doesn't flow too well."
  • "Yes he is missing his nose/hand/cockade but you could rebuild it with putty/it wouldn't be noticeable in a unit."
  • "Why are you complaining about miscasts?  Our figures are cheaper than so and so's."
Some of these have come from companies I had once rated as having excellent customer service.  I find this very disappointing.

I am aware that wargamers are a tolerant bunch but such statements gall.  There is no reason why the consumer should accept such shoddiness when buying any product.  The fact that these are little toy soldiers does not alter things!  If you think about it, would you be so tolerant if a sandwich seller said:

"You got a pubic hair in your chicken salad? Well, I am a one-man-band and my other customers never complain.  Pull it out of the mayo, it won't change the taste of the sandwich."

In short, a vendor should excersize a little elementary customer service:

  • If there are unexpected delays, drop the customer an email.  Most people will understand that real life can intrude.
  • Going on holiday and anticipate a delay when the order is accepted?  Then he/she should alert the buyer to the situation and check that you are happy to proceed.  
  • When a defective item slips through, there should be an apology with an immediate offer to exchange the item and refund the return postage (if required).
  • Moulds getting worn?  Then remake them!  Don't rely on people not noticing or being scared to complain!  
Such simple steps would go a long way to pacify even the most bellicose of customers.

Now perhaps the postman will today deliver those two orders for which I am still waiting after 3 weeks...


Sunday, 27 February 2011

Building "Fort Kalypso" - Stage 2 - Basing

Basic tools and "spacer" as described below.
Although the building is not yet complete it is now time to provide it with a base.  This is best effected at this stage to both avoid damaging the finished model and to enable the structure to be blended realistically into the groundwork.

It has to be said that buildings without bases never "sit" right on the table-top and always look as if they were simply "plonked" down without care.  

You have a couple of options.  The "scenic" base with some simple (or not so simple!) groundwork - perhaps featuring character figures and trees etc.  Alternatively you could opt for a rudimentary grounding just slightly larger than the building's footprint.  This option is seen in the majority of commercial offerings.

Personally, I favour the scenic option and some form of diorama.  In this case a few palm-trees and civilians should effectively set the scene.  Anyway, I am getting ahead of myself - first let's get the structures safely based.

Building seated and extra contours added.
You can mount the building on MDF or styrofoam, the former is stronger but cutting requires safety precautions.  As this is something of a demonstration piece and will not be handled unduly, I chose the styrofoam and hot wire method.  Roughly mark out the shape and cut out.  It helps if you contour the edges carefully as they will look more natural if a gradual profile is achieved.  


Once you have a shape you are happy with, it's time to seat the building.  I always glue them on a spacer made from card or foamcore.  This is for two reasons.  Firstly it enables you to work the ground-level up to the building and avoid obscuring your work with plaster.  Secondly, it enables you to squeeze filler into the join and this provides further adhesion.   To clarify, the spacer should be glued onto the base with "hot glue" or a contact adhesive.  The oasis should be secured with PVA as it provides a better grip.

Woodland Scenics' rocks.
Now create a few styrofoam contours to add to the base - this gives the effect of a varied ground level and breaks-up the flat surface.  The aim is to make the building look as if it is sitting in rather than sitting on the base.  

Styrofoam cut and rocks seated.
An added touch (if appropriate to your setting) can be some rocks.  A long time ago I bought one of Woodland Scenics model railroading rock-moulds.   I cast a whole lot of these and have found them very useful.  An alternative is cork bark which is available through most model shops with a train department.  The choice is yours.


Joins filled and lines smoothed.
Cut away the styrofoam as required and seat the rocks with hot glue.  Do not go too crazy with the stonework unless the setting is mountainous.  A few look great but too many just looks silly.

Once all of this is secure, get to work with the trusty Polyfilla/grout/spackle and fill in any gaps between walls and rocks and of course the join between building and base.  As before you can be pretty sloppy here as the next stage will allow you to correct any errors.  That said, try to do a good job as it will mean less time is spent on clean up later on.

Now put the building aside and go watch Sunday's Columbo re-runs.  After a day or so drying time we can move on to the walls!


Thursday, 24 February 2011

Uniform rethink

Imagine these chaps in yellow and we are close.
Sometimes delays that (at the time) seem disastrous prove - in fact - to be fortuitous.  Happily some suppliers' inefficiency has had exactly this outcome for Beimbach-Schönau!

In late 2010 I decided to document the uniforms of the 1740 army.  In part this was tailored to the figures I was awaiting from Northstar.  I had decided that their Austrians were just the ticket for my military due to the State's close proximity to Wien.

Whilst waiting and waiting (plus some waiting and a bit more waiting) for the delivery, I designed my colour combinations and worked on a whole host of elaborate schematics.  During what turned out to be an epic struggle to get my goods, I came to the conclusion that the uniforms didn't "feel" right.  This was due, in part, to my preference for the somewhat simpler "cuts" of uniform.  Additionally the different styles (Hungarian, German and Grenz) seemed to over-power a relatively small military comprising only 13 Regiments of foot.  Finally, it seemed an uninspired and predictable choice.  I want a distinctive force not an Austro-clone!

As this is an ImagiNation and my painting progress had been stymied by late deliveries, I found myself in a serendipitous position - with lots of unpainted Austrians that could be quickly resold.  So I took the plunge and decided to go with a Russian/French look.  Thus the uniform plates will be redone -  laborious but necessary.  The regimental histories, standards and facings are going to remain largely unchanged.

Simple yet attractive!
The general rule for the mid-C18 is that "German and Foreign" Line Regiments wear a French style coat (either open or closed) with the Senior Regiments wearing a Russian coat.  There will be a couple of anomalies in the "Freiwillige" Regiments and these will be noted where applicable.  The "Grenzer" Regiments will be far more "wild and wooly" as I think this appearance better differentiates them from their more "civilised" brothers-in-arms.  Grenadier Regiments will also rear their mitres (or fur caps!) and will constitute the elite "Leibgarde zu Fuß"

Happily, I have plenty of mid-C18 French figures and these will now be worked on to create the first painted units.  In fact dedicated readers will recall IR.10 von Klingenbach (WIP) was already exhibiting a Gallic flavour and is close to pre-painting completion!

However, this will not commence immediately as today I will be working on getting the first fort building completed...

Tuesday, 22 February 2011

Building "Fort Kalypso" - Stage 1a

Coffee stirrers make great planking in 28mm and larger!
First up, apologies for the delay in posting this installment.  My chest/throat infection matured and my generous children donated a bout of conjunctivitis for good measure.  Thus I have been feeling awful for a few days.  Symptoms persist but the severity is lessening so it's time to get this thing built!

The latest work is fairly simple stuff but well worth outlining.  I made some doors from "coffee stirrers".  The stirrers were trimmed (off-cuts saved) to a width that looked "right" and then glued to cereal box card with slight gaps between the planks.  These assemblies were pressed overnight to ensure a good bond.  I am aware that these gaps are large if "scaled-up" but you cannot escape the fact that the doors just look better with them in situ!

A quick note on stirrers.  You can buy a box of them as I did 5 years ago (catering suppliers have them at very low prices) or you can take a few (dozen) extra next time you buy coffee or a McBurger.  I greatly prefer them to balsa as they are harder and rougher in texture.  That said, if balsa is your thing - go for it!

Cheap pre-mixed filler is used to obliterate the various gaps.
Whilst these doors were drying I filled in all the gaps between the now dried oasis chunks.  This was effected with a cheap ready-mixed gypsum style filler.  I prefer the ready mixed as it dries faster than the stuff you mix yourself - from the smell, I think it contains some form of alcohol!  This was pushed into the cracks and smoothed with the wet pastry brush.

At this juncture we are NOT looking to add the final texture, we are looking to ensure the "skeleton" is sound. Obviously, had I carved the building from one giant block of oasis the filling would be unnecessary but big blocks cost a bomb and I am a father of three expensive children!  After fixing the dome in place with two-part epoxy, I applied more filler to the joint.  This was smoothed to better resemble the lines of the real thing.

A door trimmed and fitted.
Once all this has dried (overnight) I trimmed the doors to fit the apertures.  Fixed in place with a blob of PVA or hot glue, they should be a fairly tight fit.  You can see from the pencil-line that I adjusted my measurements during fitting.

Now is the time to add any window bars - if your plan calls for them.  I used the off-cuts from the door planks and gently "roughed" the edge to give them a "rustic" look.


The strongest way to add window bars.
Cut a slot (top and bottom) and then apply some filler to the window well.  Smooth this out with a brush ensuring there is minimal build up in the corners.  Then simply slot your bar in and smooth the filler into the remaining slots.  When dried, this will give you the appearance of a bar situated mid-wall but will be far stronger than simply glueing a piece of wood against the sills with a butt-joint.

When all the bars are fitted, put the structure aside for another evening.  When this is dry its time to roll with the creation of the textured surface.  The structure will then look much better and be ready for painting.

Friday, 18 February 2011

You don't have to be mad...

Clearly these fellows went crazy looking for Sepoys!
A fast update for my readership.  I am still feeling rank due to a throat and chest infection but I hope to be well enough to get the next stage of the fort completed this weekend.  In fact I am hoping that it will prove to be a distraction from the tickling and wheezy cough.

This week I have begun to go crazy regarding the desired marching Sepoys. Four weeks back, I had hoped Parkfield would be the solution and I placed an order only to get an email telling me I needed to add 5% to the order to cover Paypal payment.  Although not a great sum, I got miffed.  Nowhere at their site was this mentioned and I found the whole affair distasteful.

I then turned to Redoubt, who had a very interesting figure in their Renaissance Range.  He is a marching "Turk" with matchlock.  Ideal I thought, so I ordered some samples plus a selection from their "Wellington in India" collection.  After two weeks, nothing.  Calls and emails resulted in the weak assurance that I "should" be dealt with in the next week or so and that delays were due to staff being on holiday.  I was appalled by this attitude.  Of course I am aware that many wargames operations are small but to take your money and not even try to process an order (or offer a convincing apology) in three weeks is unforgivable. I duly cancelled.

This has left me in the lurch for any marching Indian/Arabian types.  There is a chap from Dixons and he may have to do but I would prefer something a little bit more interesting.  Foundry have some lovely marching Indians but there is no way I am coughing up the ludicrous £2.00 per figure plus some outrageous S&H charge.

At the moment the very simply attired "marching Sikhs" from Old Glory are the leading contenders.  I think I can just about get away with their short jackets, passing them off as some sort of Colonial dress.  Perhaps someone has better ideas?

The ladies of Dulahlipur celebrate!
On a different and happier note, I was pleased to see I have passed the 10K hit mark - for this I thank the readership and I am glad that the articles are something that you wish to peruse.  Such support encourages me to carry on posting and improving the content.


Anyway, time for bed I really need some R&R.


Wednesday, 16 February 2011

Oasis properties

Another quick posting today - I am unwell and don't feel up to much else.

Some folks have suggested that even when treated, floral oasis is too fragile for wargames use - they are wrong!  I have made a couple of videos showing the materiel before and after a soak in PVA (using an unfinished Spanish mission)  My wife kindly dropped a hammer on the samples to show the effects.

Granted, she didn't wallop with much force but this is more trauma than your average gamer will cause unless he is akin to Aunt Petunia's favourite nephew!  There is a slight indentation from "take 1" but this is minimal damage.

Remember the treatment is just phase one of the process and that the next stages serve to strengthen the structure further.

With some luck I will be able to get the completion of Fort Kalypso documented on the blog this weekend.

Monday, 14 February 2011

Building "Fort Kalypso" - Incidentals

The well method.
Just a quick posting today.  I want to illustrate both the "well" for pouring glue into a building and just how rough the basic oasis structure can be whilst remaining workable!

Cutting a large cavity into the base of a structure enables the gloop to enter from inside as well as out.  This aids absorption and thus speeds up the process.  If your construction isn't too fragile to invert - I would advise doing this.

As can be seen, I used some offcuts of oasis to build this little tower and had to use a goodly amount of cocktail sticks to pin it all together.  It looks messy and indeed it is - however the end result will not betray the hodge-podge nature of the skeleton!  I hope this shows anyone giving this a try that they need not panic if the base structure looks rickety.

Tower built from waste.
The look I am working toward is a definite pastiche.  I want the fortress to look "Eastern" or as they would say in the C18 - "Turkish".  Thus I am thinking of a period production of "Die Entführung aus dem Serail" rather than an architectural model of such and such.  In fact this tower appears a bit "Hittite" to me!  That said, it will look perfectly good once coated and it was built from waste materiel that would otherwise have been trashed.

The other face of the building is more interesting with Ogee arches and a balcony but I didn't manage to snap it before the camera battery went flat.

On a tangent, a TMPer suggested foamcore buildings are much faster to produce.  This is true, as far as the skeleton is concerned, however it misses the point of this method.  Foamcore is great but it is flat and straight (unless you buy it from Hobbycraft UK) I want buildings that are not truly straight and that have undulating surfaces.  Anyone who has been to a real fortification in the East will be aware that whilst straight from afar they are far more "organic" close-up.

This roughness would be hard to model on a foamcore base and adding lots of filler to such a skeleton is also a real pain in the rump.  But if you are content that your structures are box-like with a sprinkle of sand or a thin layer of plaster filler to roughen the surface - then clearly the "Oasis Method" is not for you!


Incidentally, I ordered some of Mega Miniatures' rather excellent "Arabian Nights" figures to dress the set!  At only $1.50 they are a steal.


Proper posting to follow shortly along with a new review.

Sunday, 13 February 2011

Building "Fort Kalypso" - Stage 2

After allowing the pinned components to dry for a few hours I had another look at the structure.  I decided that the main upstairs apartment needed more height.  Not hard to rectify, I merely cut a piece of oasis to the desired thickness and pinned it in place.

"It slimed me Ray" - Pour on the gloop.
Now we come to the first truly messy bit!  I would advise those of you with live-in womenfolk to buy a few things in advance or alternatively make sure they are out enjoying themselves at H&M/Gap etc when you start to play with their kitchen equipment.  

You will need a funnel, a large shallow dish or pan (the type used for roasting meat is great), a kitchen jug, a cheap brush (I use ASDA/WalMart pastry brushes 29p a time), an empty plastic pop bottle - 2 litre or above, a whisk or hand blender, a cookie cooling rack, an old carrier bag and preferably a turkey baster.

Firstly mix PVA glue (This time the kiddie stuff is fine - but woodworking is still better) and water into a smooth single-cream like consistency - important that this is not too thick.  You should make every effort to avoid any lumps - they cause minor problems later.  Old PVA glue will have these in abundance.  Mine had a few - annoying as this was to be a tutorial!  Just take it as a "what not to do"!  Once you have a smooth creamy gloop decant it into the pop bottle (hence the funnel)

Brush the emulsion into the oasis.
Now pour a little of the gloop into the bottom of the shallow dish and place your building on top of the liquid.  The oasis (being the absorbent "wet" type) will begin to slurp up the liquid.  If you made your emulsion too thick this will not happen and you will have an island floating on a sea of white.  Once it is absorbed start pouring the gloop all over the building, concentrating on natural reservoirs in the structure.   

The oasis will suck up copious quantities so don't be mean with your glue mix.  When the structure is drenched start brushing the collected gloop onto the structure concentrating on apertures and recesses.  This is why the turkey baster is so useful, you can shoot jets just where you want them.  My turkey baster had perished so I had to use only the brush.  If you are unlucky enough to have lumps gently brush them away - or in severe cases - pick them off.  Be especially vigilant of lumps in door/window areas as this is where they congregate.

Dipping each facet speeds absorption.
The aim is to completely saturate the oasis with gloop.  You can see when this is effected as it begins to repel the emulsion and oozes glue if gently prodded.  The absorption can be achieved more speedily if the structure is rotated whilst "basting" with each facet taking it's turn in the sea of glue.  Another way to accelerate this stage is to cut large "wells" in the building's underside.  This reduces the density of the oasis and allows the glue to enter "from the inside" as it were.

Now prepare your drying/cooling rack.  Wrap it up in a plastic carrier bag - securing the plastic with tape.  The bag is there to ensure the model does not stick to the rack when drying - it can happen and is very demoralising when it does.  Make sure the bag is sufficiently loose that you can create little recesses to collect the run-off during drying.  Now gently lift you magnum opus and place onto the rack.  Make sure all important areas are adequately supported as the oasis will now be quite heavy and any delicate parts will be liable to fracture under their own weight.  To give you some idea of this medium's absorbency, this little building drank close to 1.5 litres of gloop.

On the rack waiting to dry.
Unless you live in a warm area, you will need to use an airing-cupboard or similar to dry the building.  Do not attempt to accelerate the process in an oven as this will cause the whole thing to become brittle, fracture or indeed melt!  Depending upon the size of the building drying time can take anything up to about a week.  I expect this one to be ready in that sort of time frame.  


The end result will be a very durable but lightweight version of your original.  It will be firmly glued together and ready for the next stage.

In the meantime you can make the other structures in your complex and get to work on window frames and/or doors ready for insertion when the structure is dry. 


Saturday, 12 February 2011

Building "Fort Kalypso" - Stage 1


The inspiration.
This morning I decided to ignore the distractions of a house chock full of children and get on with the business of creating my fortified trading post.  Over the past week or so I have looked at a great many Indian/Pakistani/Afghan defensive structures and I had a general idea of how I wanted the main tower to look.

My principal inspiration was a series of photos and drawings showing what is variously described as a Mosque or a Watchtower from a site named Hampi - located in South Western India.  The building has three shallow domes, an ornate window and a roof-top terrace.  I decided that some or all of these features would work in miniature and the structure could be used as a guardroom (ground floor) and apartment for the big cheese (upstairs)

Thus enthused, I unpacked the materials and tools and got going.

Nothing too unusual here...
In addition to the usual assortment of knives, geometry gizmos and a steel straight edge, you will see my rudimentary template and some blocks of floral oasis.  As I touched on before, wet oasis is a favourite medium of mine when I wish to create a structure that is less than perfectly built and weather beaten.  Oasis lends itself to creating the wobbly lines so often seen in old stone and adobe structures.  The downside of oasis is that it is very fragile and crumbly.  However my method does not require too much precision and your errors will be obscured in the later stages of construction.  Please note it essential that you chose "wet" oasis and not it's "dry" cousin.  The reason for this will become apparent in the next installment!

Determine how much oasis you will need.
When building this type of structure I like to "wing-it" improvising as I work.  This generally results in a more relaxed looking building and you lose that "regimented" and over-engineered feel of many Western structures.

The first thing to do was determine how many blocks of oasis I would need.  I was lucky and managed to cut the basic shape from just over two - approximate cost £2.00.  The beauty of my method is that you do not need one enormous and expensive block.  Rather you can pin together pieces cut from the smaller and readily available "bricks" to achieve the desired effect.  The readily workable nature of oasis makes the cutting and smoothing the blocks as you work a very simple process.

Doorway, marked then cut-out.
Once you have sorted out which blocks go where, it's time to mark the position of windows and doors.  To do this, I place pre-cut templates in the appropriate place and follow the outline with my scalpel.  When the outline has been cut into the surface, you merely insert a long flat blade into the oasis a quarter inch or so below the surface of the external wall.  This parallel cut creates an aperture of flexible depth and neatly indicates the thickness of the structure's walls.  Simple doorways can be countersunk into elaborate frames with multiple cuts, however, in this instance I wanted the structure to remain relatively simple.

Pinning the parts.
When you have finished the windows/doors on a couple of sections it is time to pin them together.  Simply use some cocktail sticks and a blob of PVA glue.   I prefer the "Woodworking" variety (Elmers/Elch/Evo-stik etc) as it is slightly tackier and dries faster than the stuff aimed at kiddicrafts.  At this stage the sticks take the strain but the stress is minimal due to oasis' lightweight nature.

After the pieces are aligned to your satisfaction, you can repeat the processes for the rest of the structure.  Using a finger or palm you should softly smooth the oasis to both round-off straight edges and create an irregular surface.  It will seem a bit odd to do this after carefully cutting the blocks to a desired shape but believe me the building will look better for it in the long-run.

The bare bones completed - stage one ends!  
Following the methods above I pinned the completed parts together and crowned with a Christmas ornament (not yet fixed) to give myself an idea of the basic structure.  As I said earlier, details have been kept very simple as the fort is a dilapidated structure in a fledgling outpost.  The only flourish I allowed myself was the upstairs window, which is a simplified version of that on the original.  The aforementioned ornament creates a dome more ornate than those on the original but I think it will work very well once properly seated into the roof.  You could easily add turned details, ornamental stonework or buttresses.  Really the only limit is your own imagination and skill with a knife and oasis!

Now, details such as exposed brick and/or stone work can be scribed into the oasis with a cocktail stick or pencil.  My structure is supposed to be stone so I opted for regular(ish) blocks as shown in the photos of the real structure.  Adobe bricks should be a good deal smaller and far more uniform in appearance.

Once the glue is dry I can move on to stage two - the first of the messy bits my children love!

Friday, 11 February 2011

In the Doghouse

Every Gentleman needs a four-legged friend.
Every so often a thread about 28mm dogs pops up at TMP.  Usually the postee wants to know what is out there and if it looks any good with a "normal" 28mm figure.

There are quite a few manufacturers offering Canines, some depict mutts some refined pedigrees.  This goes for the quality also!

In no particular order I will deal with the models I have collected.  As an aside, I use them on my bases to add a bit of character.  Most of Beimbach-Schönau's General staff favour a four legged companion and a few of my Infantry bases will sport a mutt getting in the way of the advancing troops.  Incidentally, I have a Macaw in the parts box but cannot figure out how to use him without making things look too piratical!  Perhaps I need to create an ancient mariner named "Lang Johannes Silberstein"  then again, perhaps not.

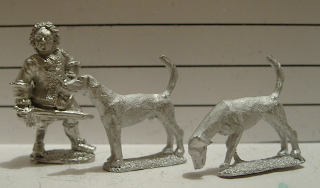
I hope these shots are of use to anyone wishing to buy their troopers a pooch or two.  Mr Alexander MacDonald appears courtesy of the Jacobite Retirement Home - he acts as a scale reference.  Neither Mr MacDonald or your author are great fans of "Man's best friend" so our opinions concerning accuracy should be taken with the proverbial pinch of salt.

SGMM (exVendel) Mastiffs - scary.
First up, four monstrous Mastiffs from what used to be the Vendel range (now owned by Sgt Major Miniatures) If memory serves me well these were sold in a pack of five in their Border Reiver range.  Horrible and aggressive looking beasts but my wife assures me they are spot-on in terms of size.  Some very nice sculpting on these, but in my opinion, some are a bit "active" to be used as companions.  More of a hunting/war party feel - good for manhunts.  Also usable as Demon Hounds or similar for those favouring Fantasy games!


Eureka's elegant greyhounds.
Now, to something more refined.  These Greyhounds are from Eureka Miniatures' George Washington set. They are beautifully sculpted and look very lithe.  Expensive miniatures but the elegance is well worth paying for.  Happily, I was sent these gratis by the chaps at Eureka (thanks again)

 Incidentally, it has been suggested that these may be "Wolfhounds" rather than "Greyhounds" - as I said earlier, I am no expert and leave it to the reader to make a decision!


Front Rank: BSP4 "William Cadogan's Dog" 
Front Rank have a dog available in their WSS range.  He is priced at the same level as their figures (in my opinion a little steep) but is a nice enough pooch - albeit a little "stiff" in his pose.  The breed is not obvious to my eyes but perhaps he is a Beagle?  A good solid model and easy to obtain.


Mega Miniatures': Labrador, Collie, St.Bernard and Alsatian.
All the remaining hounds come from Mega Miniatures USA. The proprietor has a very large catalogue of animals (and a lot else besides) and sells dogs both individually and in bargain packs - comprising two each of six different poses.


Mega Miniatures': Beagle(?), Irish Setter, and Pitbull.
Truly these are a mixed bag. Some of the breeds are (as far as I am aware) no good for the C18 but others are very useful.  Likewise, some of the sculpts are a markedly inferior to others.  I suspect this is due to their varied origins from different (now defunct) ranges purchased by MM.


Mega Miniatures': Crazy Mutt & Bulldog.
As dogs come in all manner of sizes and shapes I don't think I can castigate Mega Miniatures too harshly for the weird ones.  That said, both the Pig Faced Pitbull about to pounce and the depressed Irish Setter look a tad strange- not impossible - just odd!


When it comes to value MM Canines are great.  You get a dozen in a "pack" for around US$10.00 and can therefore keep your Generals in pets for quite some time.

I recommend checking them out before going elsewhere.

Dirty dawg!
There is also a very nice mutt in Redoubt Enterprises' catalogue.  He is a shaggy little Terrier-like thing cocking his leg.  Sadly I couldn't find mine for a comparison shot but the picture from Redoubt's site may be of interest.  Of course he would have to be unique in a given army as the "joke" wouldn't be too good if repeated - then again it worked for Henny Youngman, "Take my Wife... PLEASE".


Thunderbolt Mountain: #8046 Wood Elf Dogs
From the fantasy side of the hobby come some impressive and shaggy "hunting hounds" manufactured by Thunderbolt Mountain.  "Neotacha", a fellow TMPer, alerted me to these and very nice they are too.  TBM offer these without the Elven handler so those of us of the historical persuasion are not going to be left with an Elf lurking in the bits box!


Eureka: 100CIV28 "Frederick vignette"
Finally, "Der Alte Fritz" has brought to my attention the dogs in Eureka's Friedrich der Große vignette.  Again a very nice offering by this company.  Friedrich was renowned for his Italian Greyhounds that prowled the palace of Sanssouci and accompanied him on campaign.  It is my opinion that the Eureka hounds are a little "beefy" to properly depict this diminutive and fragile looking breed.  However, they remain a fine product and should be given due consideration.

I hope this has been of some use to anyone considering a metal pet.


Thursday, 10 February 2011

Progress - at last!

If only I had such an assistant!
Despite a family tragedy last week, I feel my project is finally making some great strides.

The new fortress has been "hewn from the living rock" (make that Oasis!) and is presently drying in the airing cupboard.  My Sepoy problem seems to have a solution on the horizon.  Finally, my ongoing quandary about Beimbach-Schönau's coats has been resolved.

In the near future I will post the first of the "How-to" articles regarding the new fort.

I ordered some Victrix/Renedra plastic 40x40mm bases and will be using the "Black Powder" rules system. I received the tome as an anniversary gift and it is pretty impressive.  However it could do with a few more C18 illustrations for all us lace enthusiasts.

On the down side, I am still waiting for the Redoubt order and had a few difficulties with Front Rank - the latter appear to be happily resolved but Redoubt remains an annoyance.  Two weeks and no goods - it's just not on these days especially when one considers it is a UK-UK order.

At the moment I am feeling quite unwell but with some luck, the blog should soon have a good deal of interesting new posts.  Including a couple of figure reviews and perhaps a dog comparison also!

Monday, 7 February 2011

Fortification problems

Reworked bastion minus gun ports.
Last weekend I got almost nothing done - very annoying as I had plans.  In my defence this wasn't due to pure indolence - my wedding anniversary and various other family matters intervened.

Having reworked the Fauxban fort's battlements and decided upon exotic gunports, I realised the project was simply too complex.  Not in terms of my competence (as I have built many far more detailed items in the past) but rather simply too large to be practical.  Thus the structure will be shelved, albeit reluctantly, for the foreseeable future.

Exotic "Indian" apertures.
Although given my current circumstances the first incarnation is too ambitious, a more modest version will work.  I have already collected the resources and done my mental planning.  Fort Kalypso will now be more akin to a local guard tower and will be much easier to stow away.


Using Osprey's "Indian Castles 1206-1526" for inspiration, I have decided that the structures will resemble a native stronghold with European additions.  Hopefully this will create an interesting building.  I will use my tried and tested "Oasis and Styrofoam" method which has proven most effective in the past.

The inspiration, still attractive though less imposing!
This will be documented as the method is (as far as I know) unique and people may well wish to employ it themselves.

On another topic, after 11 days I am still awaiting delivery of my small trial order from Redoubt Enterprises.  Rather annoying as this is taking longer than a simultaneous Trans-Atlantic trade I organised.  I had a potentially bright idea for "Sepoys" and had hoped Redoubt would be the solution but if this is typical of their turnover time I may reconsider.


Redoubt FIW Provincial.
Talking of Redoubt, I was very interested in one of their FIW figures, namely a "Provincial Marching".  I was seriously considering this fellow for the Colonial Infantry (even the European!) but I am concerned about a couple of things.  Firstly, he has no bayonet attached and this looks a little odd when mixed into an army of spike wielders.  Secondly (and more importantly) he appears to have very short arms.   If this is the case it would be a little weird as the rest of the FIW range is nicely proportioned - unlike the dreadful American Revolution figures.  I hope the stunty limbs are merely an optical illusion - perhaps my requested sample will clarify matters.

Well, enough rambling time to get chopping.


Thursday, 3 February 2011

Colonial ideas

A distinctly "Oriental" aperture.
It's been a difficult couple of days here at Schloss Krautheim.  The lady wife was hospitalised and "Daddy day care" has not allowed for much model-making time.  "What about the Domestics?" I hear you cry!  Sadly these were released from servitude a long time back...  Thankfully, all seems well on the health-front - but appendages are still crossed - ouch!

I have been doing a bit of research during the evenings and decided to work a couple of fresh ideas into "Fort Kalypso".  Firstly, the walkway battlements are getting a re-do.  I have decided to model these with "Indian" apertures instead of the "Fauxban" gun ports.   I have used a prototype from Fort Golkonda  as inspiration and the cannon ports will be reworked later today.

Fort Golkonda - Hyderabad.
In addition I am toying with the idea of a simplified version of the fantastic multi-faceted tower (left) as my main bastion.  This may be short-lived as that is a pretty ornate structure.  The alternative involves some rather splendid domes and will display Islamic influence - probably a better choice considering the Colony's location.


A couple of Tories and a Continental Marine.
When it comes to the troops, I fancy something decidedly C18 but "different".  Looking around and about I once again found myself at Front Rank.

They have some interesting "Slouch Hat" wearers in the American Revolution range.  The Continental Marine and Provincial Infantry are contenders.  I favour the latter for their natty plumes but the webbing for the British backpack is a real turn-off.  To me it makes them look, well, too British!  Perhaps someone can tell me if there were similar items in service with other States' armies during this period?  If there was precedent I would almost certainly go for the Tories as they look so good!  Also, they sport a bayonet and it is well known that "Johnny Native" is always scared off by cold steel!  Apparently "They don't like it up 'em".

I will get some more pictures of the Fort posted ASAP.